Netography AWS VPC CloudFormation Stack Automation
If your company is using CloudFormation Stacks to manage and deploy VPC resources across your AWS organization, this guide should serve as a starting point for onboarding new devices to Netography Fusion and importing existing EC2 asset information as context labels.
0. Prerequisites
Netography offers several deployment variations depending on your organization's needs.
| Feature | Description |
|---|---|
| Basic | Creates role needed to manually add Flow Sources to Netography Fusion. |
| Flow/DNS | All of Basic + A stack to create a VPC with a lambda-backed custom resource, automatically uploading new VPCs to Netography Fusion. Optionally enable Route53 DNS query logging via the DnsLogsEnabled parameter to upload query logs as well. |
| Context | All of Basic + A stackset with a lambda-backed custom resource, automatically creating context integrations for all AWS accounts. |
For all deployments
- Add the following policy to the bucket where flow logs and/or DNS logs are stored. If you have an existing policy, you can add the statements directly (ensure it does not conflict). Replace
BUCKET_NAMEwith the name of your logging bucket andROOT_ORG_IDwith your AWS organization ID.{ "Version": "2012-10-17", "Id": "AWSNetoLogDeliveryPolicy", "Statement": [ { "Sid": "AllowRoute53ResolverandFlowLogging", "Effect": "Allow", "Principal": { "Service": [ "delivery.logs.amazonaws.com", "route53resolver.amazonaws.com" ] }, "Action": [ "s3:PutObject", "s3:GetBucketAcl", "s3:ListBucket" ], "Resource": [ "arn:aws:s3:::BUCKET_NAME", "arn:aws:s3:::BUCKET_NAME/*" ], "Condition": { "StringEquals": { "aws:SourceOrgID": "ROOT_ORG_ID" } } } ] } - Assuming you have obtained a
NETOSECRETfrom the Netography portal, add it to AWS secrets manager like so:aws secretsmanager create-secret \ --name NETOSECRET \ --description "Netography API credentials" \ --secret-string $NETOSECRET - If you have not done so already, you need to setup
SELF_MANAGEDpermissions for AWS. Follow the instructions here to deploy both theAWSCloudFormationStackSetAdministrationRoleandAWSCloudFormationStackSetExecutionRolein the logging account (where you will deploy the Netography stackset).
1. IAM Policy and Custom Role for Netography
The first step is to deploy a CloudFormation stack that creates the necessary IAM roles and stacksets (depending on deployment setup). These roles allow Netography to read flow logs from your S3 buckets and, if you choose to automate, deploy the necessary resources for automatic traffic/dns source creation. It also can deploy a lambda to create context integrations automatically.
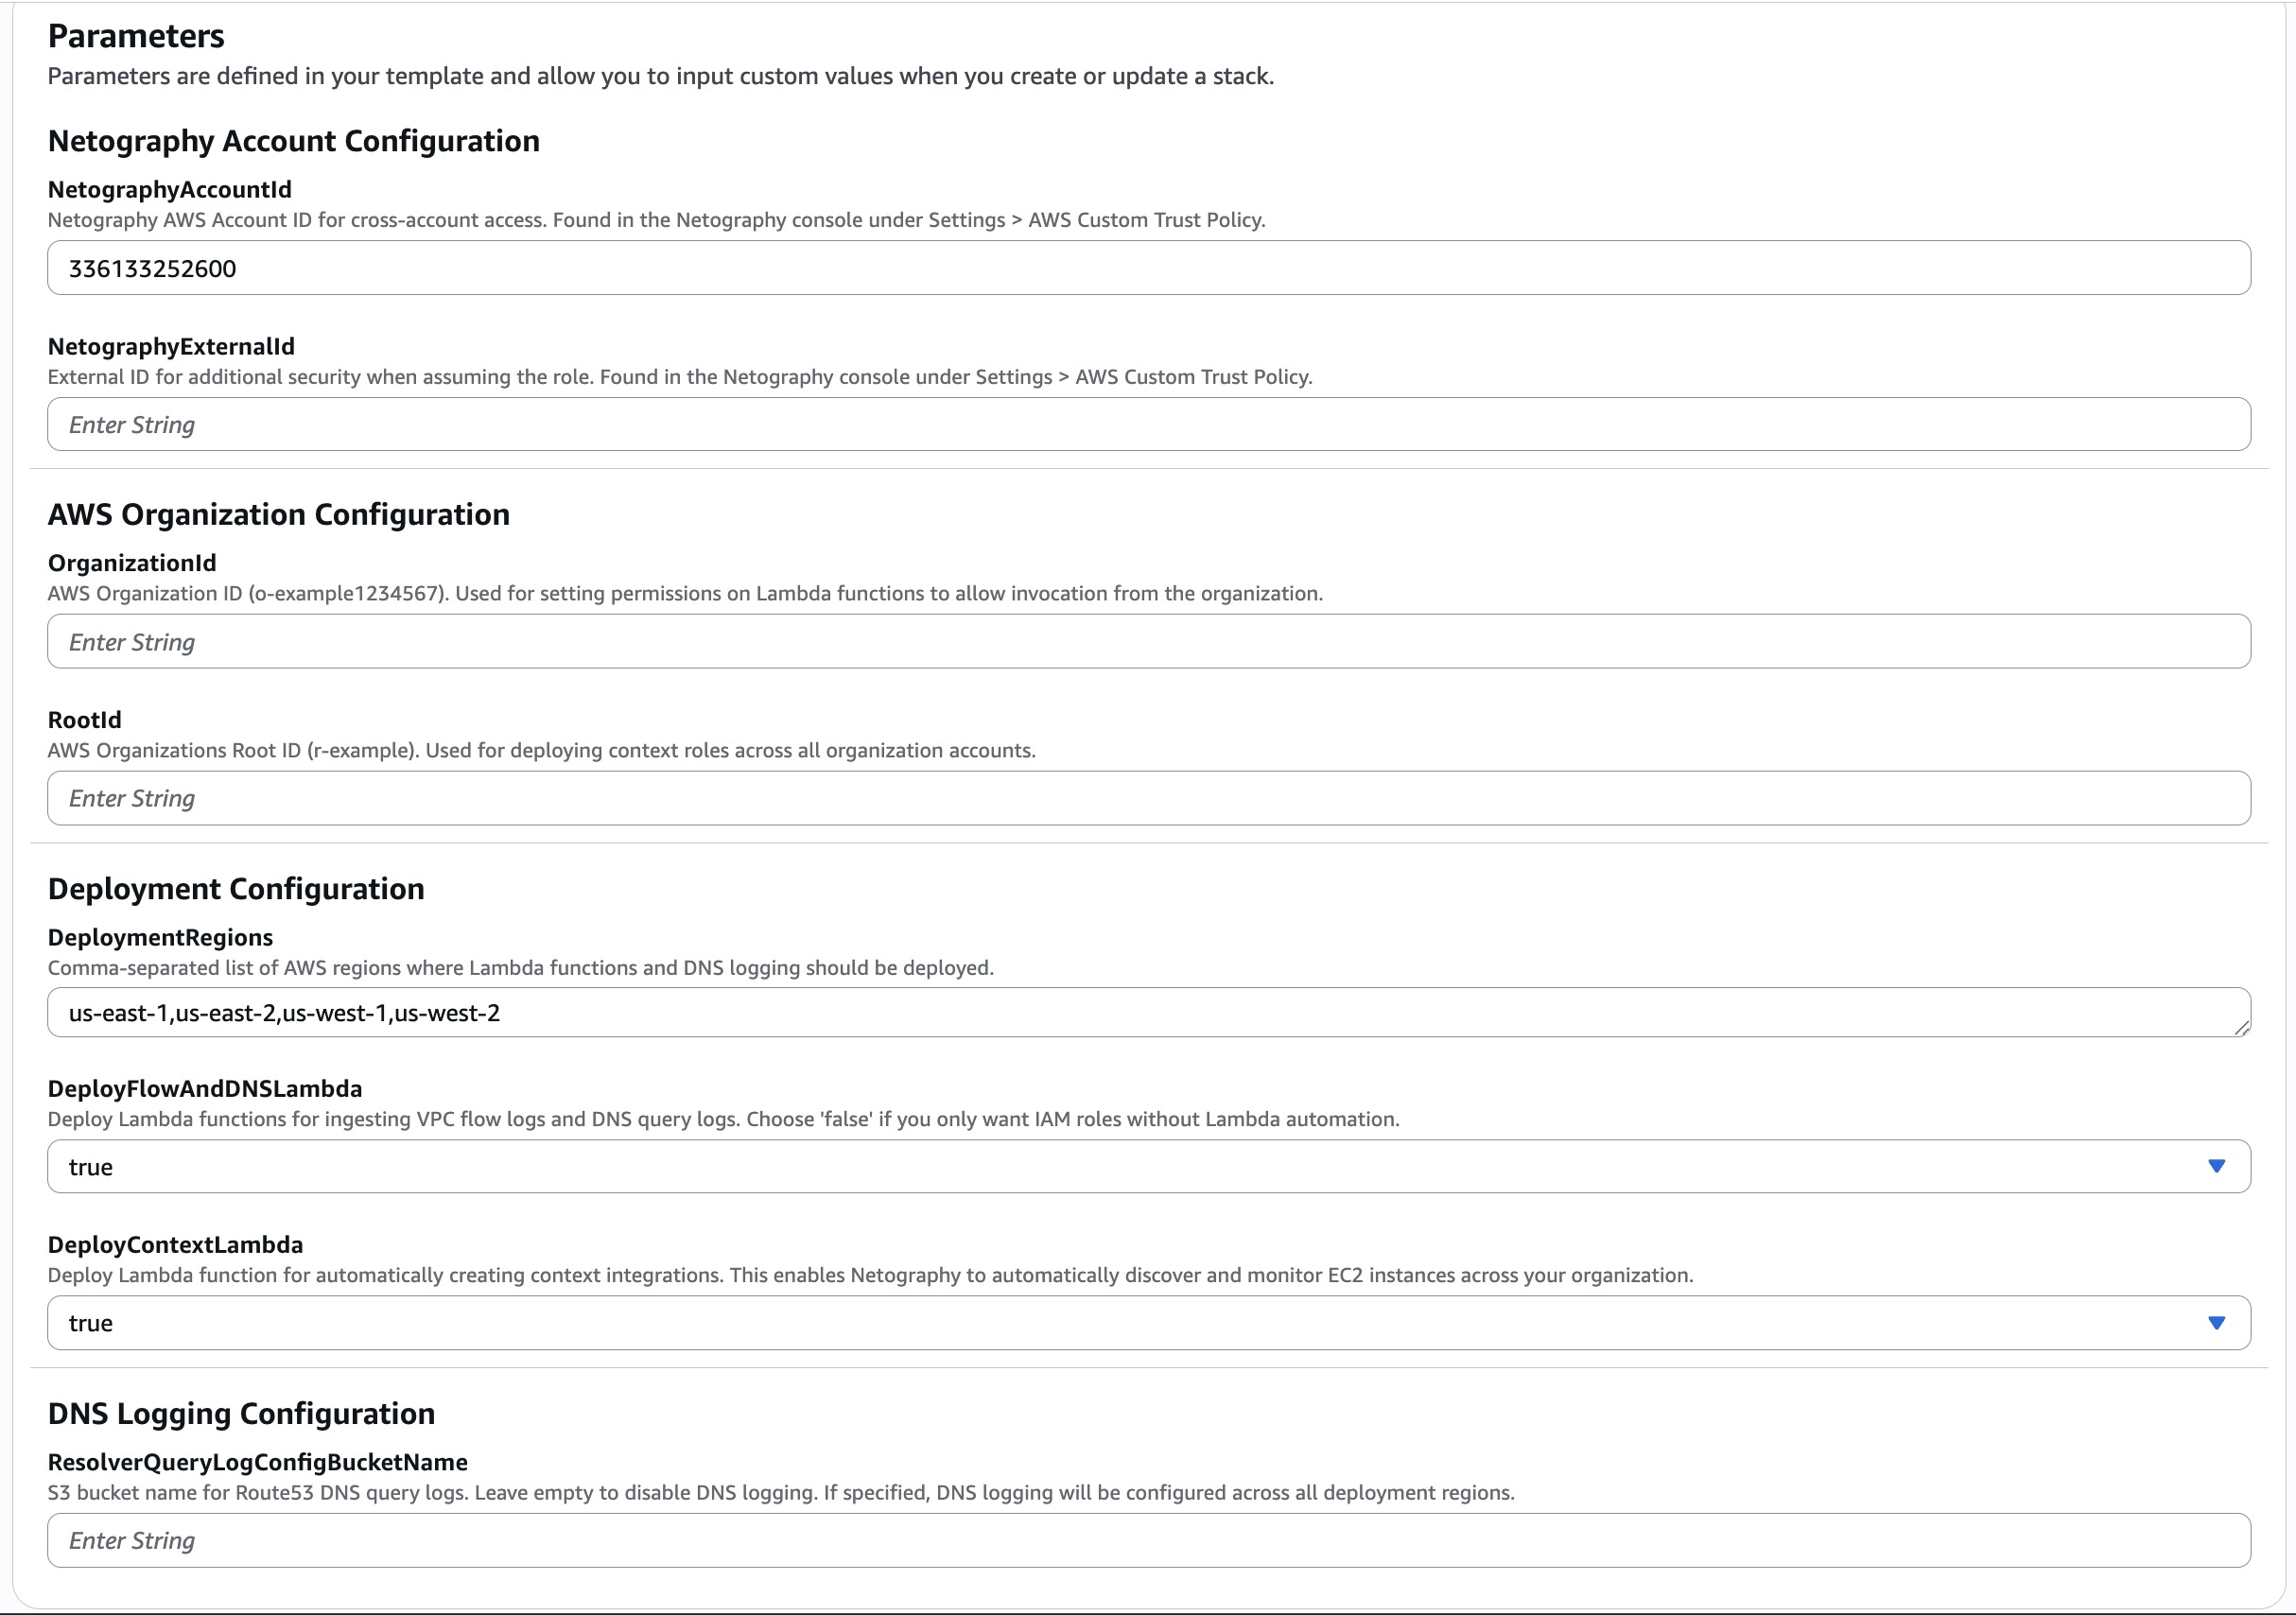
To make this process easier, we've provided the netography-base.yaml CloudFormation template at https://neto-downloads.s3.us-east-1.amazonaws.com/aws/netography-base.yaml. When deploying the CF template, you should see these options:

-
First, set a name for your Stack. For the sake of this example, we're calling it
NetographyBase. -
Navigate to
Settings > AWS Custom Trust Policyinside Netography Fusion to find yourNetographyExternalID. Enter that in the corresponding field.- If you do NOT wish to deploy either lambda, set
DeployFlowlogLambdaandDeployContextLambdatofalseand create the stack. Once the stack completes, check the output to get your RoleARN. You should be good to start adding sources to Fusion! Skip the rest of these steps.
- If you do NOT wish to deploy either lambda, set
-
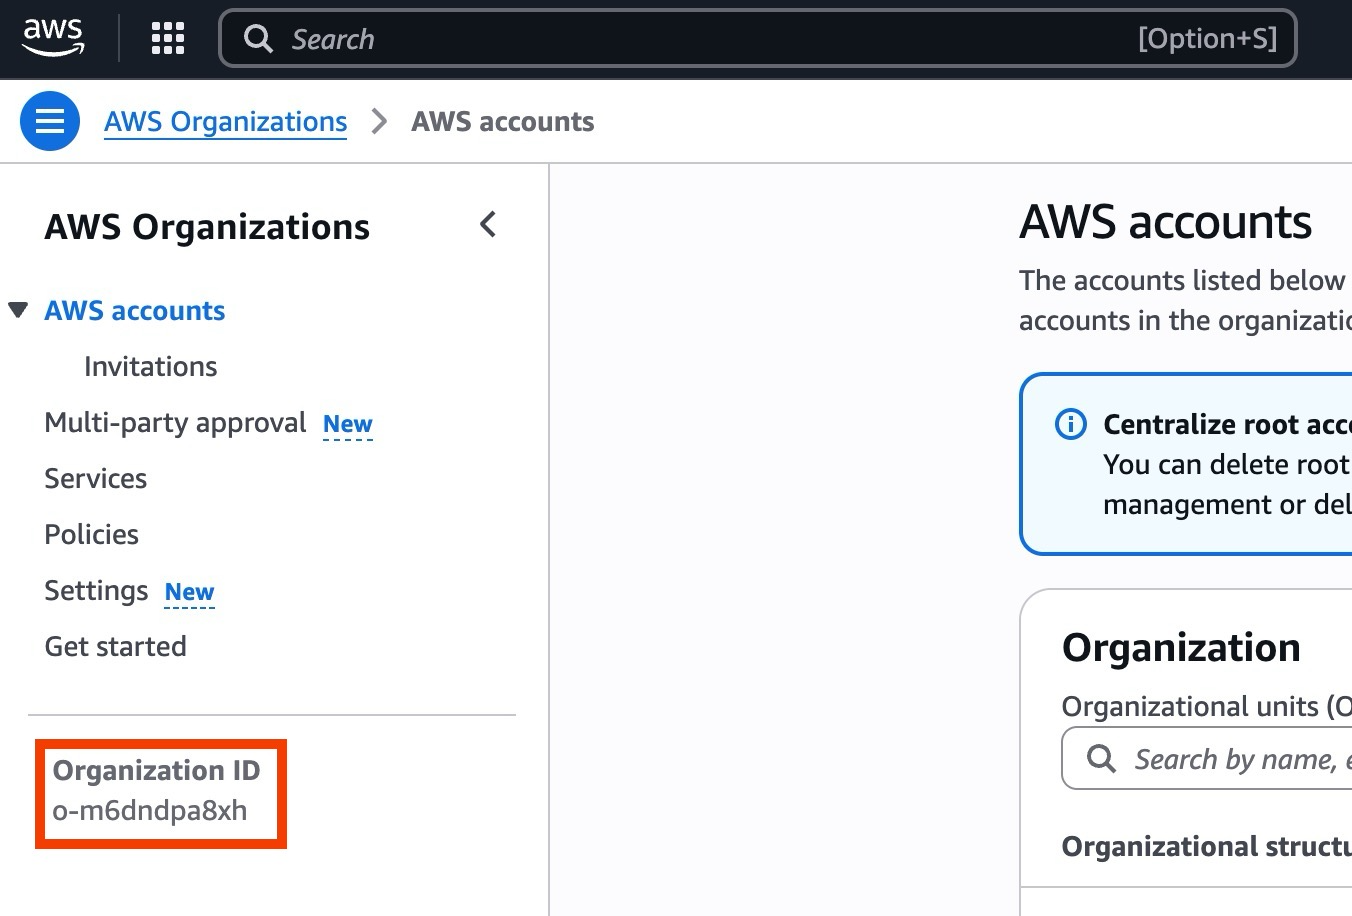
Copy your organization ID as shown below inside
AWS Organizations, and paste it insideOrganizationID.

- While inside AWS Organization, also grab the
Rootid which should look something liker-123456. Copy that and paste inside theRootIdparameter. - Set the
DeploymentRegionsto all the regions you want to ingest Flow and DNS logs from. - If you wish to enable DNS query logging, in the
DNS Logging Settingssection setResolverQueryLogConfigBucketNameto the name of an S3 bucket where Route53 query logs will be stored. Logs will be saved undervpc-dns-logs/in that bucket. - Deploy the stack!
The CloudFormation template will create a role with the following permissions if DeployFlowAndDNSLambda is set to false:
| Role | Description | Permission (Scope) |
|---|---|---|
| NetographyRole | Role Netography assumes to read flow logs from S3 into Fusion. | s3:GetObject (*)s3:ListBucket (*)s3:GetBucketLocation (*) |
This scope can (and should) be limited to the buckets you intend to read flow logs from. To do so, edit the YAML file directly.
2. Flow - Automatically Onboarding New VPCs into Netography Fusion
If you are using CloudFormation to create VPCs and/or configure flow logs, you can use a Lambda-backed custom resource to call a Python function as part of the CloudFormation stack. This will then be applied to all newly created VPCs, and will work regardless of how the CloudFormation stack itself is deployed. If you are using AWS Service Catalog to deploy a CloudFormation stack to create new VPCs and configure flow logs already, you can add the final step of creating the Fusion traffic source for the VPC with this approach.
Once you've deployed the IAM Policy and Custom Role for Netography, you can simply deploy the vpc-cf.yaml template found here: https://neto-downloads.s3.us-east-1.amazonaws.com/aws/vpc-cf.yaml
aws cloudformation create-stack \
  --stack-name $VPC_STACK_NAME \
  --template-body file://../examples/vpc-cf-template/vpc-cf.yaml \
  --parameters \
    ParameterKey=VpcCidr,ParameterValue=10.0.0.0/16 \
    ParameterKey=CentralizedLoggingAccountId,ParameterValue=$CENTRALIZED_ACCOUNT_ID \
    ParameterKey=EnableDnsLogging,ParameterValue=False
3. DNS - Automatically Onboarding New DNS sources into Netography Fusion
DNS logging can be enabled with a modified version of the same command (assuming the base stack has been deployed in Fusion).
aws cloudformation create-stack \
  --stack-name $VPC_STACK_NAME \
  --template-body file://../examples/vpc-cf-template/vpc-cf.yaml \
  --parameters \
    ParameterKey=VpcCidr,ParameterValue=10.0.0.0/16 \
    ParameterKey=CentralizedLoggingAccountId,ParameterValue=$CENTRALIZED_ACCOUNT_ID \
    ParameterKey=EnableDnsLogging,ParameterValue=False
    ParameterKey=ResolverQueryLogConfigID,ParameterValue=$RESOLVER_QUERY_LOG_CONFIG_ID
Notes on deploying this example
- The
NetographyBasestack must be deployed before any VPC stacks. - If you delete the roles stack, all VPC stacks will fail until roles are recreated.
- S3 permissions are set to
"*"in this example to allow access to any bucket across all VPCs; this should be restricted to the actual set of bucket(s) that are required in a production deployment.
Cleanup
To remove these stacks if you are testing a deployment:
-
Delete all VPC stacks first:
aws cloudformation delete-stack --stack-name my-vpc-1 aws cloudformation delete-stack --stack-name my-vpc-2 # ... etc -
Then delete the base stack:
aws cloudformation delete-stack --stack-name NetographyBase
3. Context - Automatically adding AWS Context Information to Netography Fusion
Netography Fusion supports ingesting EC2 device info as context labels, which are then linked to relevant IPs and flow traffic. To enable this deployment, when deploying the NetographyBase stack toggle DeployContextLambda to true.
Once the stack instances have been deployed, you should see context integrations populate inside of Netography Fusion!
Updated about 1 month ago
