Adding a Detection Model
Detection Models monitor network traffic and generate events when specific conditions are met. Context Creation Models assign context labels to IPs that match certain conditions. Each configuration will differ based on its unique roles and purposes in network data analysis.
Add Detection Models
Step 1: Access Detection Models
In the Netography Fusion Portal, select DETECTION MODELS in the left-hand menu.

Detection Models
Step 2: Add a New Detection Model
In the Detection Models screen, click the ADD MODEL button in the top left corner and select Detection Model from the drop-down. This will open the Add Detection Model configuration window.

Add a New Detection Model
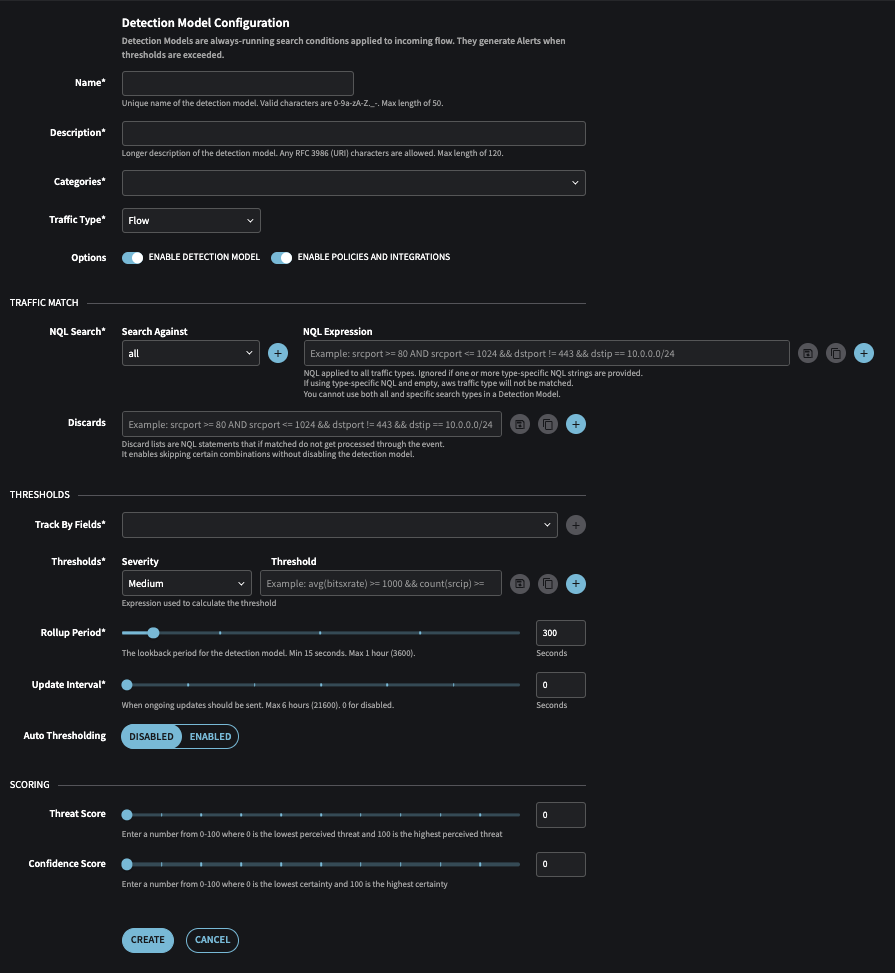
Step 3: Configure the New Detection Model
Fill out the necessary fields and options to configure your new Detection Model:
General Configuration
- Name: Enter a unique name for your Detection Model.
- Description: Provide a brief description of the Detection Model's purpose and function.
- Categories: Select one or more categories from the drop-down menu, including system options and any custom categories you've created.
- Traffic Type: Select
FloworDNSto determine what type of traffic this Detection Model is for. - Enable Detection Model: The Detection Model is only active in Fusion if this is enabled.
- Enable Policies and Integrations: If disabled, response policies and response integrations will not be executed when this Detection Model generates an event.
Traffic Match
The traffic match section defines the traffic ingested into Fusion to which this detection model will be applied. Multiple rows can be added using the + button to specify unique NQL Expressions for different Flow or DNS types.
- NQL Search:
- Search Against: Select a Flow or DNS type from the drop-down menu to determine what type to apply the NQL Expression.
allwill be used for all Flow or DNS types except those specified in a separate row. - NQL Expression: The NQL to use to filter the traffic included in this Detection Model. Click the text box to bring up the keywords, recent queries, and NQL Presets.
- Search Against: Select a Flow or DNS type from the drop-down menu to determine what type to apply the NQL Expression.
- Discards: To exclude traffic that would otherwise match the NQL Expression you defined in NQL Search, add one or more NQL statements in Discards.
Thresholds
- Track By Fields: Select one or more fields from the drop-down menu, choosing from the current Track By field options available. Multiple Track By field lines can be added using the + button.
- Thresholds: Configure two thresholds for the Detection Model by selecting a severity level (
Low,Medium, orHigh) and creating an NQL expression for each. You can create a separate threshold for each severity using the + button. - Rollup Period: Enter a numeric value between 15 and 3600 (1 hour) to define the rollup period for this Detection Model.
- Update Interval: Enter a numeric value between 1 and 21600 (6 hours) to set the update interval for this Detection Model. A value of
0will disable updates.
Scoring
- Threat Score: Enter a numeric value between 0 and 100. 0 is the lowest perceived threat, and 100 is the highest perceived threat.
- Confidence Score: Enter a numeric value between 0 and 100. 0 is the lowest confidence, and 100 is the highest confidence.
Step 4: Save Your New Detection Model
After configuring the new Detection Model, click the CREATE button to add it to your Detection Models list. The new Detection Model will be active if it is enabled and generate events based on its configuration.
Add Context Creation Models
Step 1: Access Context Creation Models
In the Netography Fusion Platform interface, select DETECTION MODELS in the left-hand menu.
Step 2: Add a New Context Creation Model
In the Detection Models screen, click the ADD MODEL button located in the top left corner and select Context Model from the drop-down. This will open the 'Add Context Model' configuration window.
Step 3: Configure the New Context Creation Model
A Context Creation Model has the same configuration options as a Detection Model, except the LABELS section replaces the SCORING section. See the configuration options for Detection Models above.
A context creation model must include srcip and/or dstip in the Track By Fields configuration.
Labels
A context label section will be shown for srcip and for dstip if it is configured in the Track By Field Configuration.
Context Labels: Add a context name and one or more label values for that context by entering a value or selecting an existing value from the drop-down.
- Expiration: A numeric value between 60 and 86400 (24 hours). The context label(s) created will be removed once it expires.
Step 4: Save Your New Context Creation Model
After configuring the new Context Model, click the CREATE button to add it to your Detection Models list. The new Context Creation Model will now be active and ready to generate alerts based on the specified conditions.
You can also create a new Detection Model from existing DMs by clicking the 'Create As New' option in the right side ellipsis of an existing DM
While system DMs can be edited, the Name, Description, and Categories of a system DM cannot be changed
Updated about 1 year ago
