AWS S3 Transit Gateway Flow Logs
This document provides instructions for configuring the collection of AWS Transit Gateway Flow Logs with an S3 bucket and configure log notification with SNS and SQS using the AWS Console.
It is recommended that the s3 bucket is in the same region as the VPC. If you pointed multiple flow logs to the same bucket they will need to be differentiated by the folder prefix.
AWS Console Steps
- Create S3 bucket
- Create an IAM user
- Optional: Create the SNS Topic
- Optional: Create the SQS queue
- Update S3 bucket
- Publish to S3
Create S3 bucket
-
In the AWS Console select Services and type s3 into the search bar
-
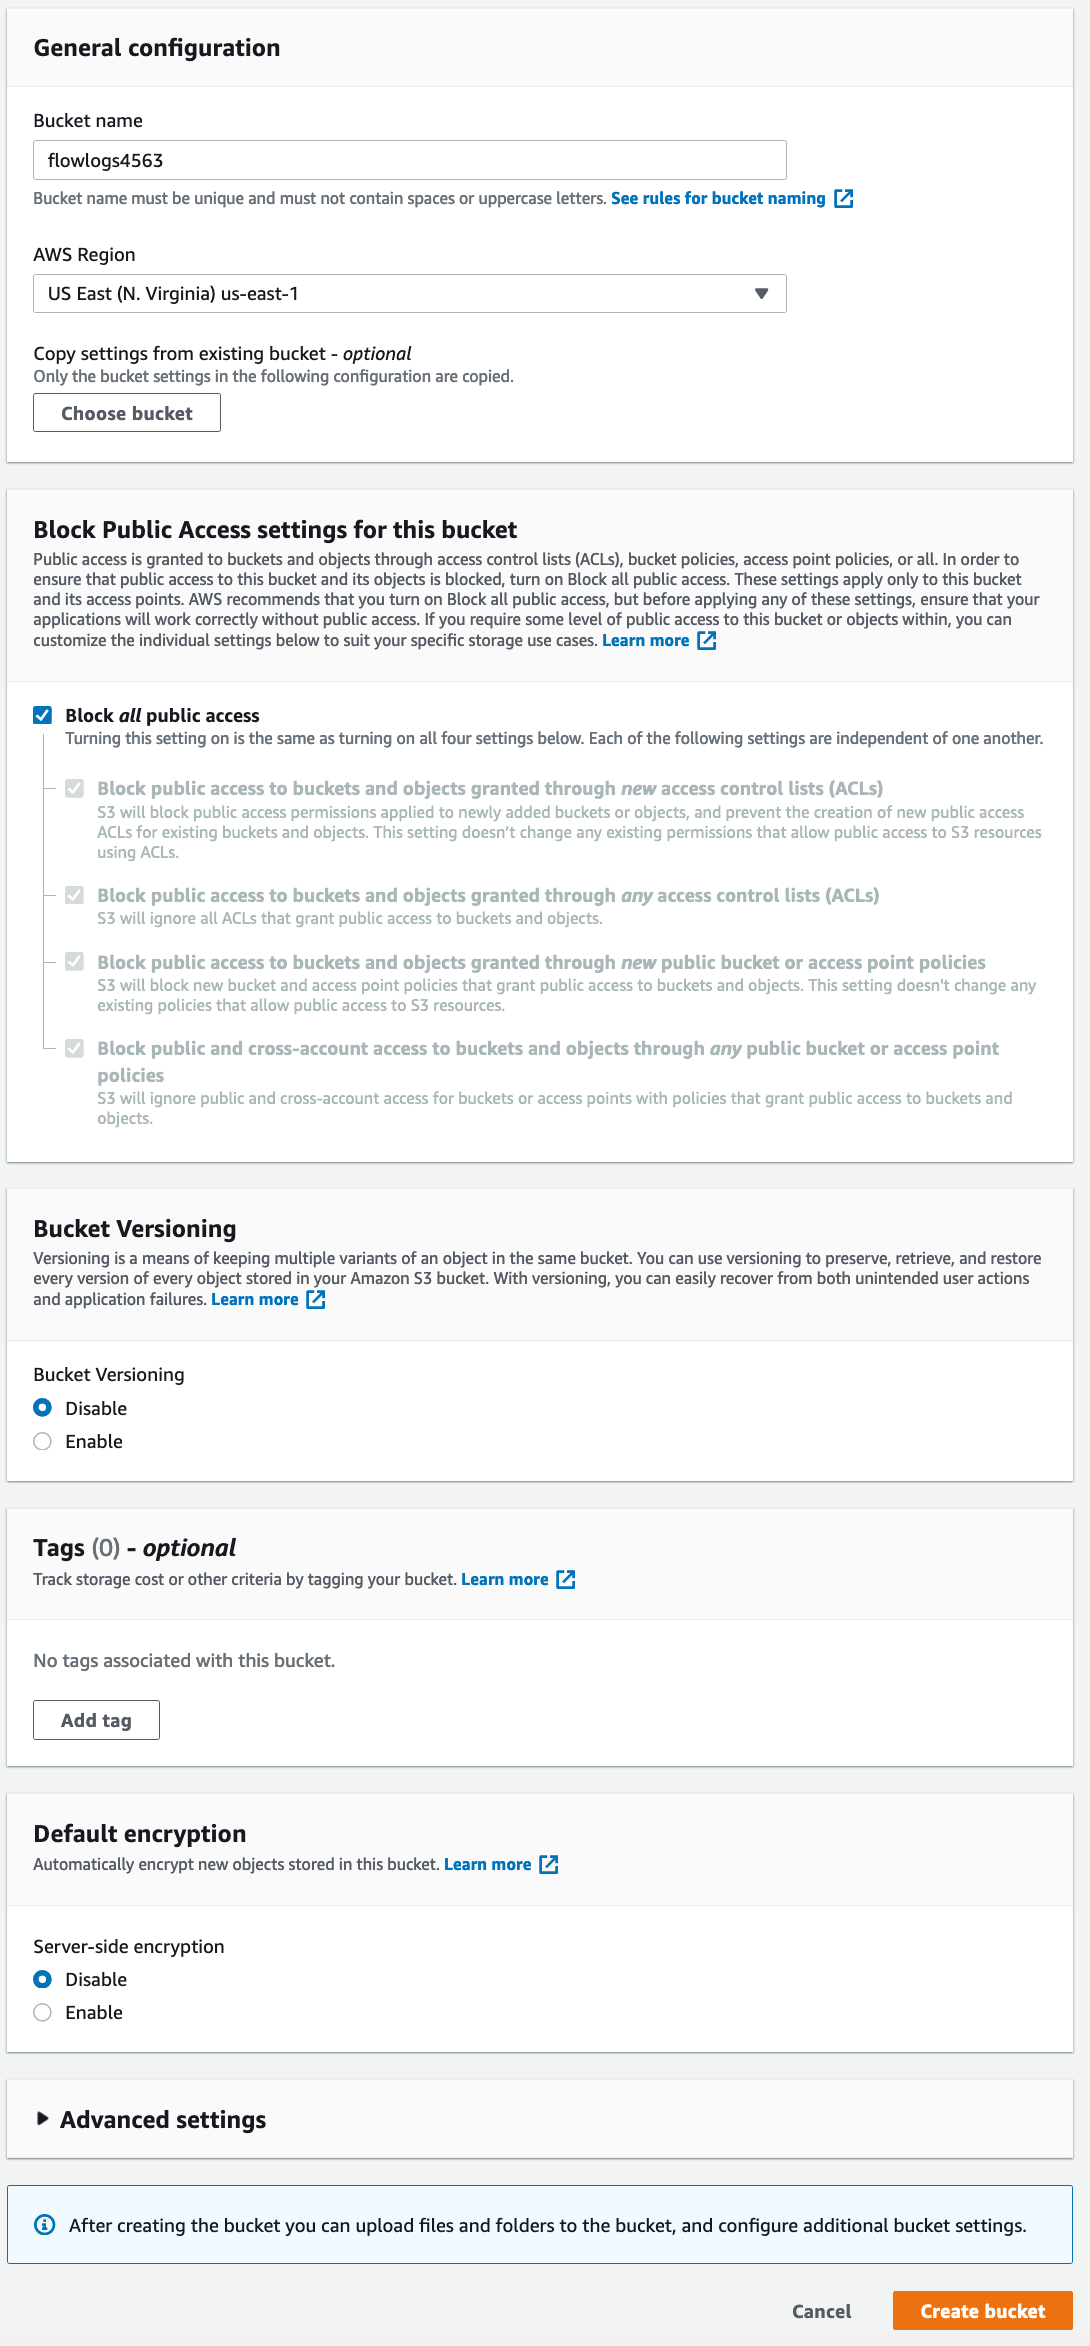
Enter your bucket name, select your region, optionally add tags and click "create bucket"
-
From the S3 bucket listing check the box for the bucket you created and click Copy Bucket ARN to make note of it.

OPTIONAL: Create the SNS topic
- In the AWS Console select Services and type sns into the search bar
- Select "Standard" type.
- Enter a name for the SNS topic.
- Add optional tags and click "Create Topic"
OPTIONAL: Create the SQS queue
-
In the AWS Console select Services and type sqs into the search bar
-
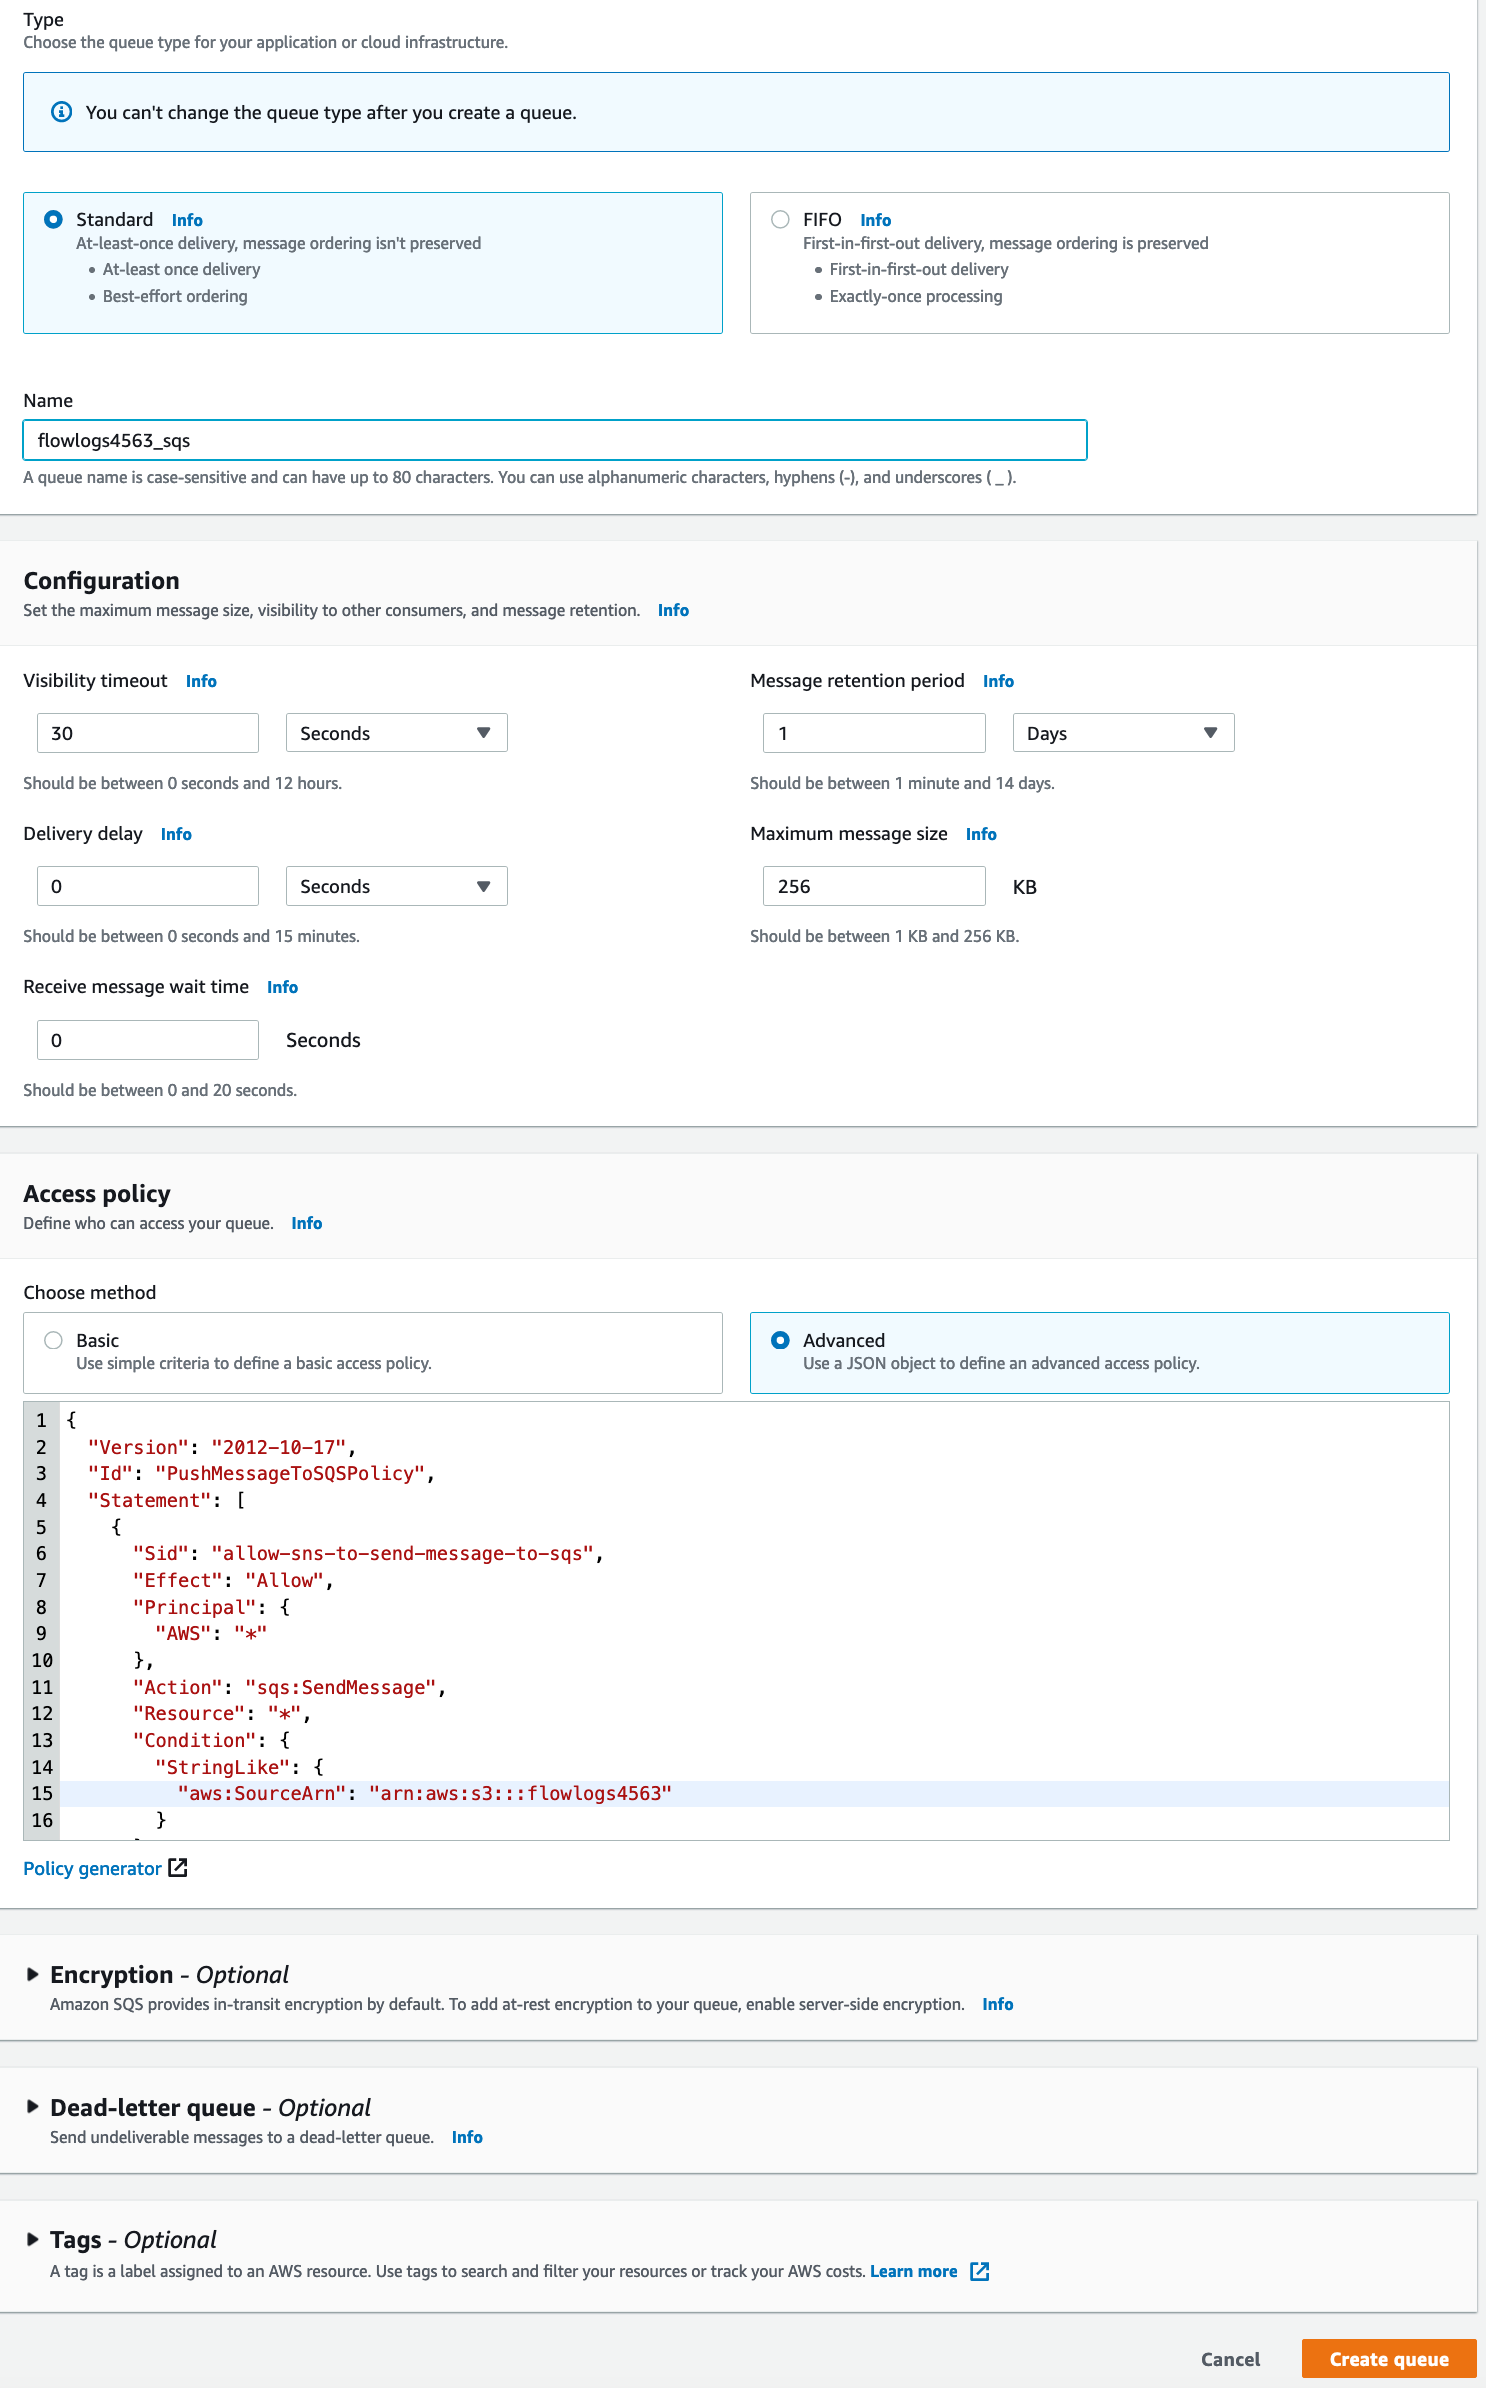
Enter a queue name and click configure queue
-
Set Message Retention Period to 1 day.
-
Under Access Policy select advanced and use the following JSON. Update the SourceArn with your S3 ARN.
{ "Version": "2012-10-17", "Id": "PushMessageToSQSPolicy", "Statement": [ { "Sid": "allow-sns-to-send-message-to-sqs", "Effect": "Allow", "Principal": { "AWS": "*" }, "Action": "sqs:SendMessage", "Resource": "*", "Condition": { "StringLike": { "aws:SourceArn": "arn:aws:s3:::<bucketname>" } } } ] } -
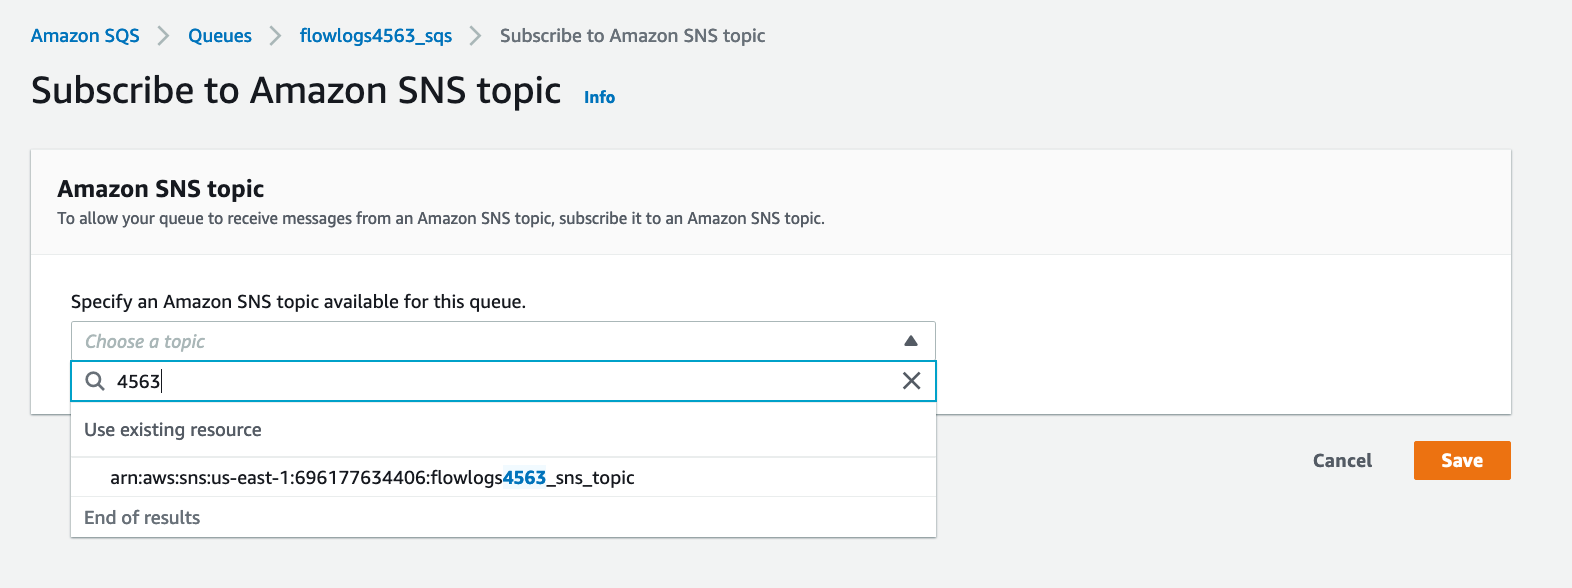
Select your SQS queue under the SNS Subscriptions tab click "Subscribe to Amazon SNS Topic".
-
Choose your SNS topic and Subscribe then click "Save".
-
Make note of your SQS URL and SQS ARN
Create Netography Policy
-
In the AWS Console select Services and type "iam" into the search bar
-
Under Access management click Policies
-
Click create policy and then the JSON tab.
-
Use the following after updating arn:aws:s3.
-
Then click review and then create
{
   "Version":"2012-10-17",
   "Statement":[
      {
         "Sid":"VisualEditor0",
         "Effect":"Allow",
         "Action":[
            "sqs:DeleteMessage",
            "sqs:GetQueueUrl",
            "sqs:ReceiveMessage",
            "sqs:GetQueueAttributes",
            "s3:ListBucket*",
            "s3:GetObject*",
            "s3:DeleteObject*"
         ],
         "Resource":[
            "<sqs arn>",
            "arn:aws:s3:::<bucketname>/*",
            "arn:aws:s3:::<bucketname>"
         ]
      }
   ]
}
Create an IAM user
-
In the AWS Console select Services and type iam into the search bar
-
Click Add user and enter a user name
-
Check Programmatic access for the Access type and click next
-
Click Attach existing policies directly

-
Enter the policy name you created
-
Select it and click next
-
Fill in your tags (optional) and click next
-
Review and create user
-
Make note of Access Key ID and Secret access Key
-
From the Users table in IAM click the user you create and make note of the user ARN
Update S3 bucket
-
Select your bucket and click the properties tab

-
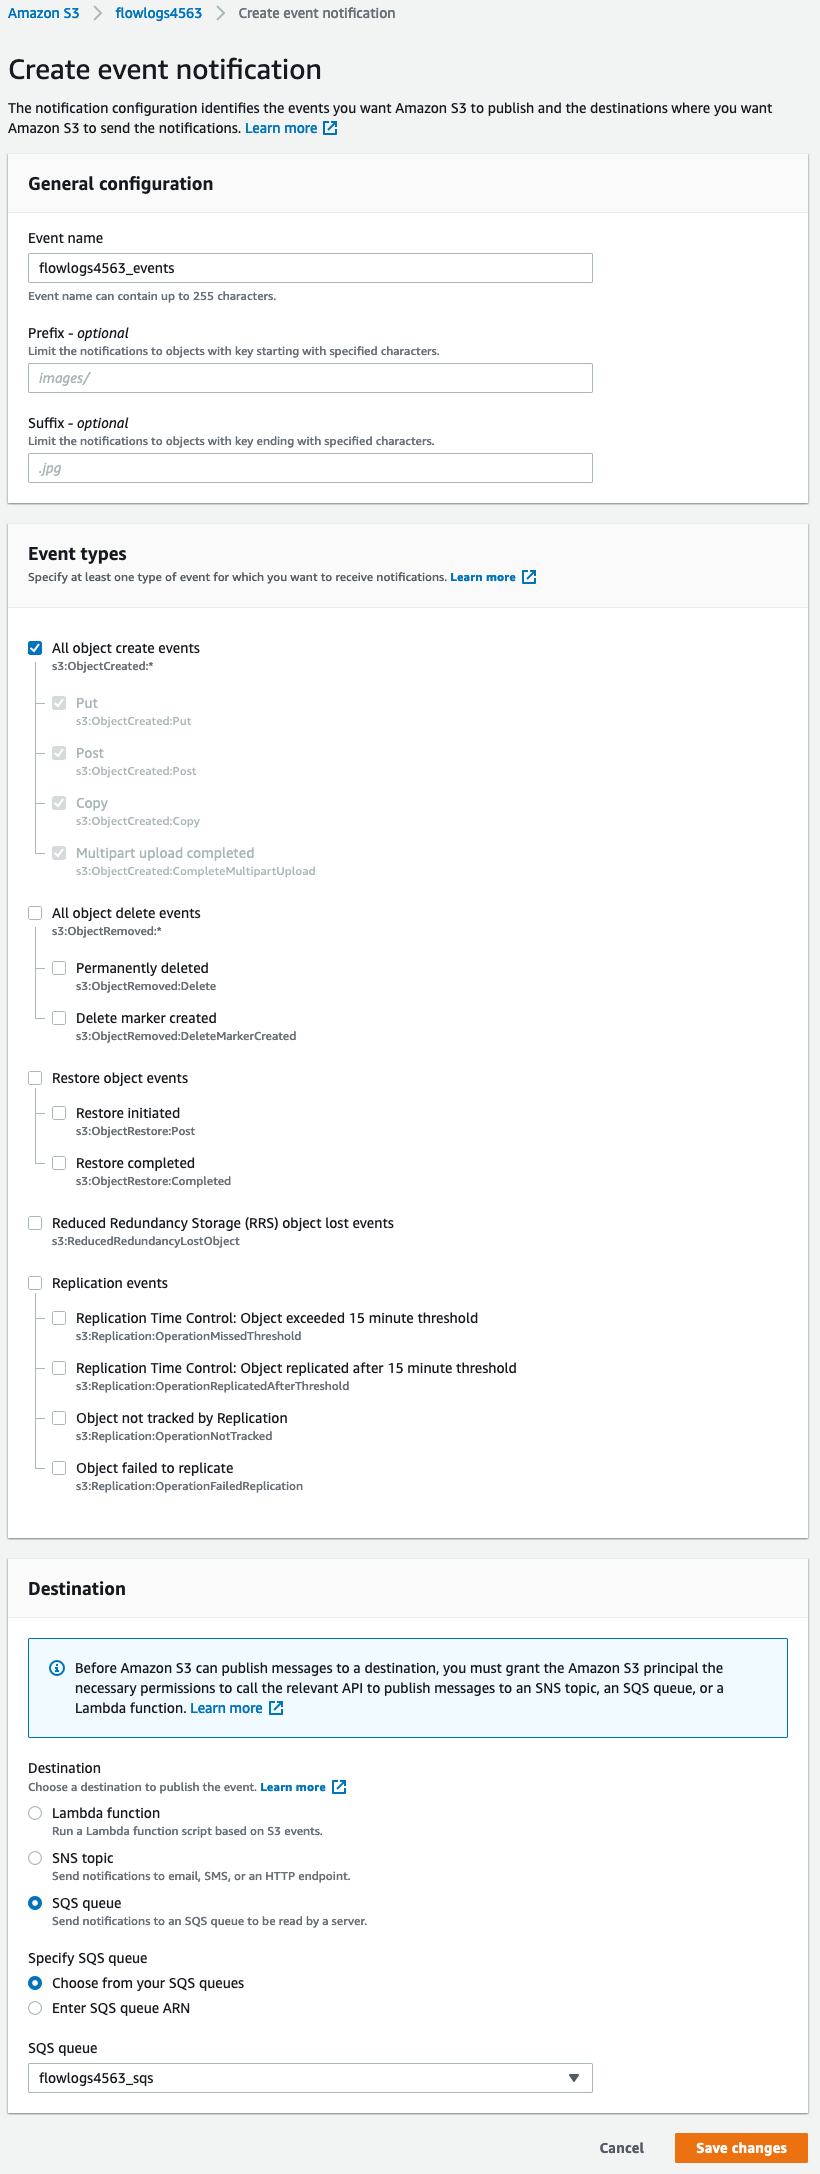
Scroll down to Event notifications and click "Create event notification"

-
Enter a name.
-
Check All object create events.
-
Use SQS Queue for Destination.
-
Select your SQS Queue for SQS Queue.
-
Click "Save".
Create Transit Gateway Flow Logs that Publish to S3
- In the AWS Console select Services and type transit into the search bar
- Click Transit gateways then select your Transit gateway ID link.
- Then click the create flow log button.
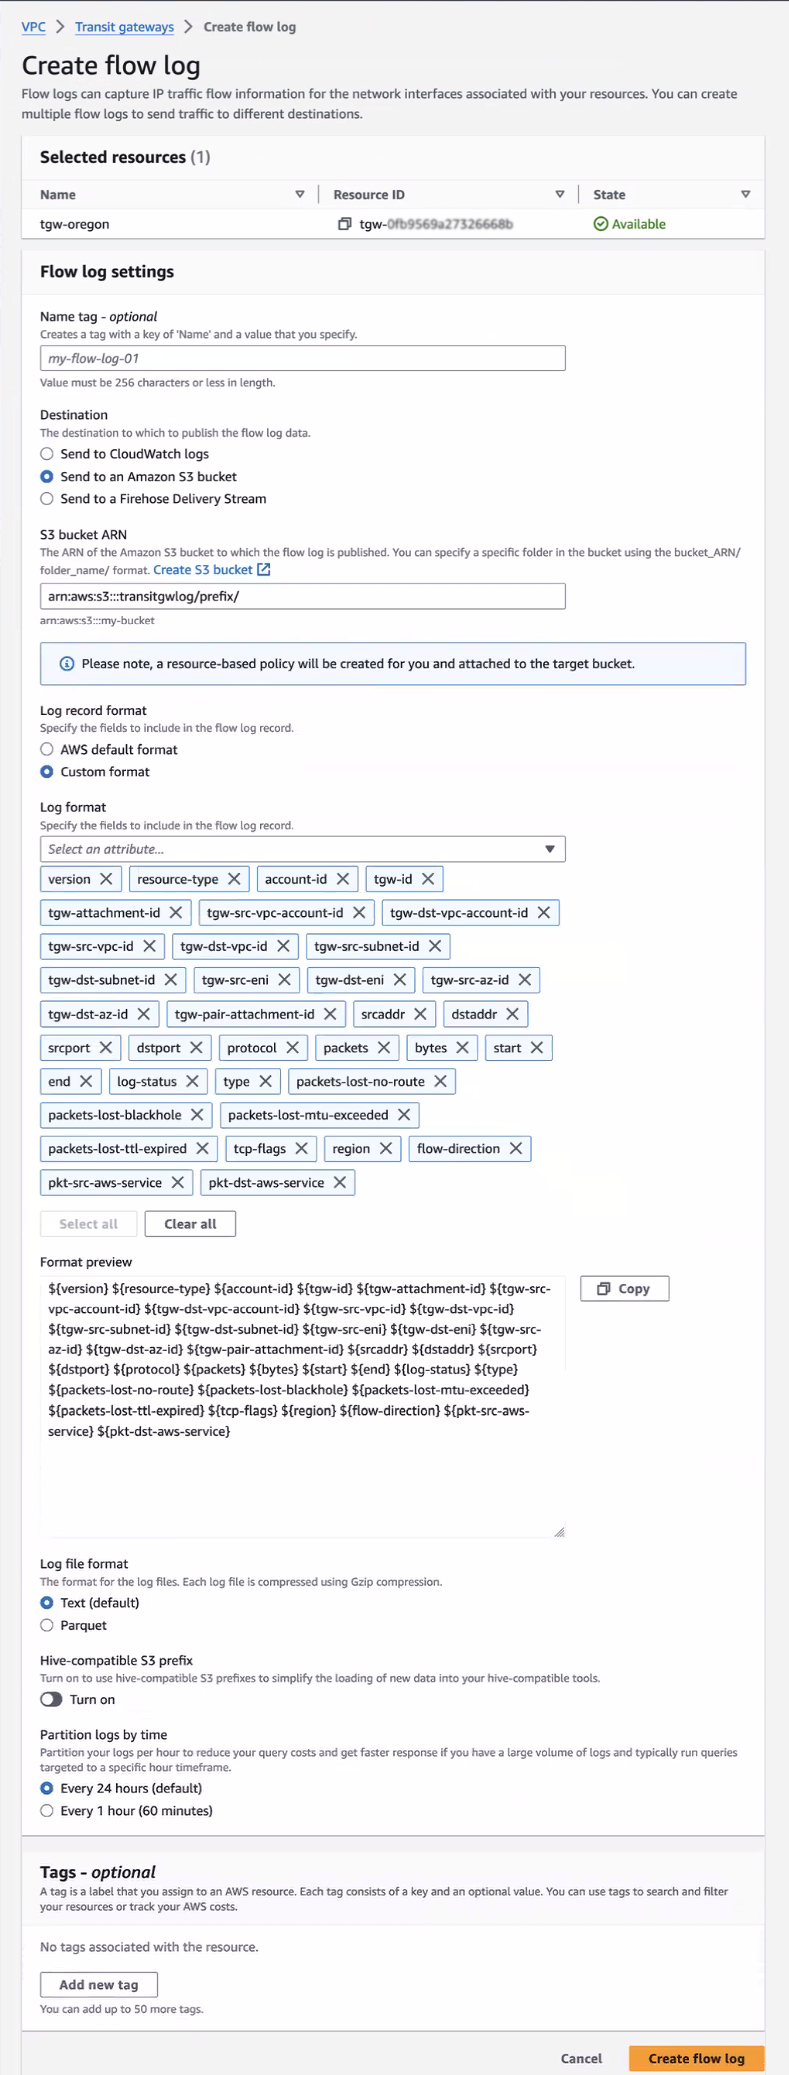
Create flow log screen.
-
Select "Send to an S3 bucket" for Destination
-
Under S3 bucket ARN fill in your s3 bucket ARN.
-
Select Custom format and select all available attributes.
-
Click the Create flow log button.
Netography Portal Steps
- Navigate to Settings > Traffic Sources,
- Click Add Traffic Source.
- Click the AWS S3 Transit Gateway tile.
Configuration
The path to the S3 bucket ARN is constructed using the Account ID and Region fields, along with the current date, using the following structure: AWSLogs/{Account ID}/vpcflowlogs/{Region}/YYYY/MM/DD/
Example: AWSLogs/123456789012/vpcflowlogs/us-east-1/2023/06/28/
The Prefix field can be used if the flow logs are being organized in folders. e.g. setting the Prefix to folder_name would modify the above to become folder_name/AWSLogs/123456789012/vpcflowlogs/us-east-1/2023/06/28/
The following fields are specific to the AWS S3 configuration.
| Field | Required | Description | Examples |
|---|---|---|---|
Account ID | yes | Account ID of the flow source | 1234-5678-9012 |
Region | yes | Location of the flow source | us-east-1 |
Bucket | yes | The S3 bucket name | bucket_name |
Bucket Region | yes | The region of the S3 bucket | us-east-1 |
Remove Log | Remove the log from the S3 bucket after processing | ||
Prefix | Folder prefix | folder_name | |
sqs URL | If provided, sqs will notify Netography that a new object was written for immediate ingest. | https://sqs.us-east-1.amazonaws.com/123456789012/flowlogq |
AWS authentication
Netography Fusion can access your AWS account using one of two different methods:
- IAM user via an Access Key ID & Secret Access Key
- IAM Roles using a Custom Trust Policy created by Netography.
AWS Access Key
To configure access via Access Key/Secret, select the "Key/Secret" Authentication Type. The values for the ID and Secret are accessible in the AWS IAM console.

AWS IAM Roles
You can use an IAM role in Netography Fusion to access your Cloud Flow Logs for flow ingest or account data for the AWS Context Integration. To enable this, go to the portal and retrieve the AWS Account ID and External ID from your Account Settings. Navigate to the gear button on the top right to view your Account Settings to see the Overview tab as shown below:
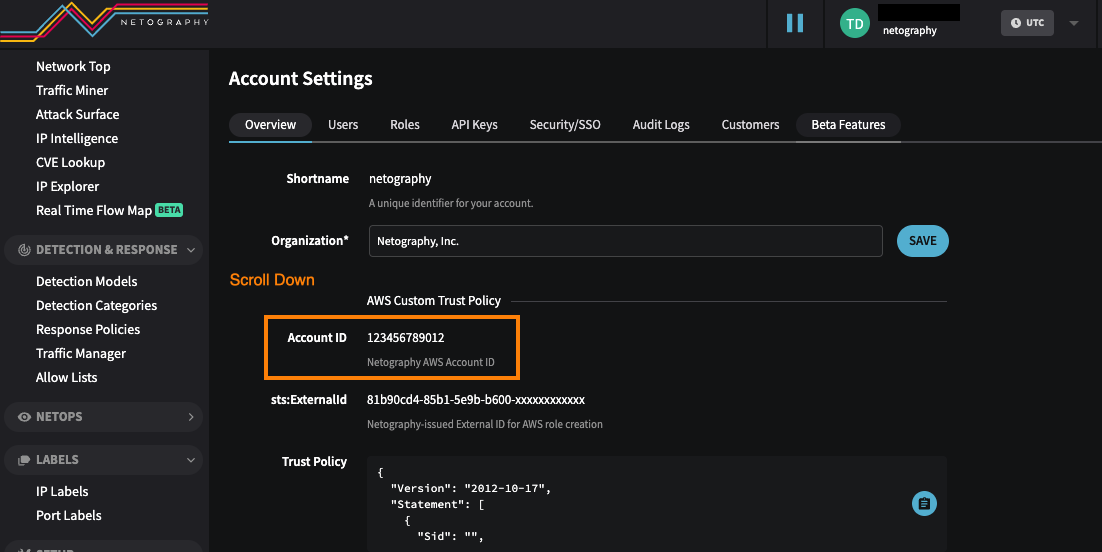
In AWS, you will configure permissions using the Account ID grabbed from above to create the IAM Role. When configured, AWS creates the Amazon Resource Number (ARN) for the role. For more information in configuring the permissions to the Account ID, refer to the following AWS guide:
The newly created ARN is required in order to configure IAM role access in the Netography Fusion portal.
Once the ARN has been created, the remaining steps are to toggle the Authentication Type to Role in your AWS
S3 configuration settings, input the AWS Account ID grabbed earlier from your Netography account settings, and the supply the ARN configured from AWS as shown below:

Updated about 1 year ago
